
Notice
Recent Posts
Recent Comments
Link
| 일 | 월 | 화 | 수 | 목 | 금 | 토 |
|---|---|---|---|---|---|---|
| 1 | 2 | 3 | 4 | 5 | ||
| 6 | 7 | 8 | 9 | 10 | 11 | 12 |
| 13 | 14 | 15 | 16 | 17 | 18 | 19 |
| 20 | 21 | 22 | 23 | 24 | 25 | 26 |
| 27 | 28 | 29 | 30 |
Tags
- tusit font 추가 방법
- traits
- task cancel
- identifiable
- swift 점선
- uikit toast
- task cancellation
- reactorkit
- swift dashed line
- swift navigationcontroller
- 타임라인 포맷팅
- custom navigation bar
- custombottomsheet
- rxdatasources
- DP
- RxSwift
- swift 백준
- BFS
- swift bottomsheet
- paragraph style
- domain data
- SWIFT
- coordinator
- UIKit
- swift custom ui
- swift concurrency
- custom ui
- Tuist
- claen architecture
- button configuration
Archives
- Today
- Total
김경록의 앱 개발 여정
[ReactorKit] 기본 예제 분석하고 내 프로젝트에 적용하기 본문
Counter 앱의 Reacotr 분석
Reactor
final class CounterViewReactor: Reactor {- CounterView라는 뷰의 Reactor
- 기본적으로 하나의 뷰의 하나의 리액터, 이렇게 함으로 개별 관리가 용이
Action
enum Action {
    case increase
    case decrease
}- Action의 경우 사용자의 인터렉션에 기반한 행위를 정의
- 실제 프로젝트에 적용함에 있어서 어느범위까지가 Action인가에 대한 고민이 있었는데,
테이블 뷰 셀렉티드, 필요시 스크롤링하는 동작까지도 Action의 범주로 들어가서 정의해주면 된다. - 해당 예제에선 숫자의 증가와 감소 두개의 액션을 정의했다.
State
    struct State {
        var value: Int
        var isLoading: Bool
}- State의 경우 화면상에서 가질 데이터의 모음이다
- 이 앱의 경우 즉각 눈에 보이는 건 값 즉 Value
- 일단 예제 코드엔 추가적으로 isLoading과 alertMessage가 존재했다.
mutation
enum Mutation {
    case increaseValue
    case decreaseValue
    case setLoading(Bool)
    case setAlertMessage(String)
}- Action과 State의 연결다리
- 그러니까 결국 State에 있는 Value를 어떻게 만들어줄까 라는 동작을 정의
Mutate is a state manipulator which is not exposed to a view
정확히는 Mutate는 뷰에 노출되지 않는 상태 조작자입니다. 라고 얘기하고 있다
- 여기선 당연히 값의 증가와 감소, 더 나아가 로딩 상태의 변화, 알럿 메세지의 수정이 포함
initialState, init
let initialState: State

  init() {
    self.initialState = State(
      value: 0, // start from 0
      isLoading: false
    )
}- 초기 State의 설정이 필요, 위에서 정의 한 State를 사용한다
- init에서 State의 초기 값을 직접 지정할 수 있다.
여기까지가 Reactor의 기본 구성 요소
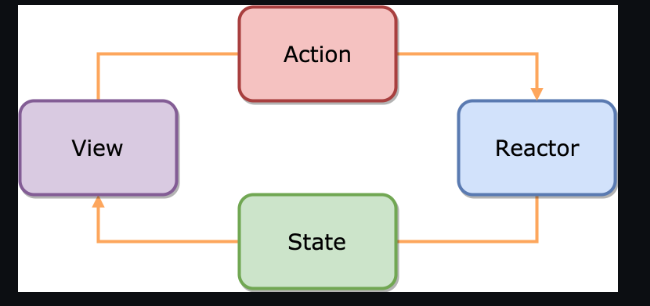
다시 한번 짚어보는 Reactor의 동작 사이클을 보며 필요 메서드들에 대한 분석
mutate() → Observable(Mutation)
func mutate(action: Action) -> Observable<Mutation> {
    switch action {
    case .increase:
      return Observable.concat([
        Observable.just(Mutation.setLoading(true)),
        Observable.just(Mutation.increaseValue).delay(.milliseconds(500), scheduler: MainScheduler.instance),
        Observable.just(Mutation.setLoading(false)),
        Observable.just(Mutation.setAlertMessage("increased!")),
      ])

    case .decrease:
      return Observable.concat([
        Observable.just(Mutation.setLoading(true)),
        Observable.just(Mutation.decreaseValue).delay(.milliseconds(500), scheduler: MainScheduler.instance),
        Observable.just(Mutation.setLoading(false)),
        Observable.just(Mutation.setAlertMessage("decreased!")),
      ])
    }
}- 기본적으로 concat을 통해 여러 Observable을 순차적으로 연결하여 하나의 Observable로 묶어주고 있음
- 로딩을 true로 바꾸고 값을바꾸고 다시 로딩을 false로 처리해주는데, 그 사이에 딜레이가 있다 이런 방식을 취하려해 isLoading이 있었나보다
reduce()
func reduce(state: State, mutation: Mutation) -> State {
    var state = state
    switch mutation {
    case .increaseValue:
      state.value += 1

    case .decreaseValue:
      state.value -= 1

    case let .setLoading(isLoading):
      state.isLoading = isLoading

    case let .setAlertMessage(message):
      state.alertMessage = message
    }
    return state
}- 파라미터로 받아온 state를 변경하기 위해 함수 내부에서 변수로 선언해줬다
- Value의 증가 감소량을 정의해줬다, 만약 변동 폭이 변경된다해도 수정하기 편해보인다
이론 공부와 예제 공부를 했으니 직접 적용해보기로 했다.
내 프로젝트에 직접 적용하기
- 겪은 문제점 위주로 정리해보았다.
수정 전
- 현재 프로젝트에선 Viewmodel를 주입받아 사용하는 중
final class HomeViewController: UIViewController { private let viewModel: TestViewModel init(viewModel: HomeViewModel) { self.viewModel = viewModel super.init(nibName: nil, bundle: nil) }- ViewModel을 Reactor로 바꾼다. 라는 생각을 가지고 진행했더니 이런 코드가 나옴
위 코드의 큰 문제점은 VC가 View 프로토콜을 채택하여 가진 reactor 외에 다른 reactor 를 참조해서 사용하고 있다는 점.
수정 후
final class HomeViewController: BaseViewController {

    var disposeBag = DisposeBag()

    init(reactor: HomeReactor) {
        super.init(nibName: nil, bundle: nil)
        // View 프로토콜이 제공하는 reactor에 주입 시킴
        self.reactor = reactor
    }

	  override func viewDidLoad() {
	  // ViewDidLoad는 해당 작업과는 관련이 없어짐
		}


//MARK: Reactor

extension HomeViewController: View {
    func bind(reactor: HomeReactor) {
    // 기존 fetch 코드를 좀 더 행동에 알맞아 보이게끔 네이밍을 변경
    // 프로토콜의 메서드내에서 바로 Action을 emit하도록 수정
        self.reactor?.action.onNext(.viewDidLoad)

        reactor.state.map { $0.posts }
            .bind(....)
- 주입받는건 동일, 하지만 Viewmodel처럼 reactor 의 인스턴스 선언은 필요없게 되었다.
View프로토콜을 채택하면 알아서 생기기 때문 - ViewDidLoad때 필요한 동작 자체(네트워킹 등)를 Action으로 정의하기로 했다.
- ReactorKit의 의도에 맞게 모든 reactor 관련 코드는 bind 함수 내에 위치하도록 변경했다
- 중구난방으로 관리되던 Reactor관련 코드를 전부 bind(reator: ) 내부에 몰아넣을 수 있게 되었다.
'TIL' 카테고리의 다른 글
| [Tuist] Tuist 를 통한 커스텀 폰트 추가 방법 (0) | 2025.01.13 |
|---|---|
| [Swift]ReactorKit, Coordinator 그리고 화면 이동과 데이터 전달 (0) | 2025.01.09 |
| [ReactorKit] 공식문서 훑어보기 (0) | 2025.01.09 |
| [RxSwift] RxSwift에서 얘기하는 시퀀스 (0) | 2025.01.09 |
| [RxSwift] RxSwift (0) | 2025.01.09 |
'TIL' Related Articles
more

